A couple of months ago, I was invited to join the Adobe Influencer Program where I get to connect with folks from Adobe as well as other creative professionals and enthusiasts. One of the perks of being in this group is getting access to their latest releases for review – I was offered the Adobe Creative Suite 5.5. Being a web designer and photographer, I chose the Adobe CS5.5 Design Premium which includes the latest version of Photoshop. After a couple of weeks of using this, and playing around with its sexy new features, this is my review.
I’ve been using Photoshop way back since I started designing websites – with Photoshop version 3. That’s 9 versions and 13 years ago. Wow, that’s a long time. Now they have Photoshop CS5 Extended, and indeed, it has grown by leaps and bounds since then. Two features stood out to me: Refine Edge, and Content-Aware Fill.
Refine Edge: Complex selections made easy
As a designer, creating complex selections has always been my pet peeve… especially when it comes to the trickier parts like hair. Photoshop CS5 has introduced “Refine Edge” feature that makes it all quick and easy.
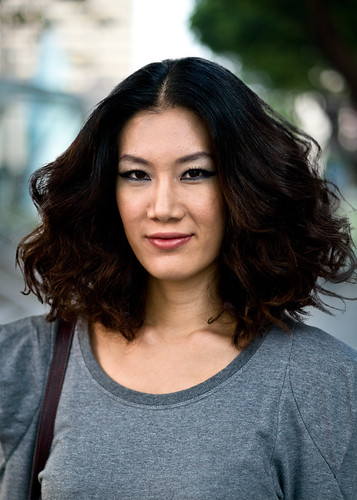
Here’s a portrait of a lady with awesome hairdo, taken in Orchard Road while working on our 5 Sec Faces project. As I took the photo, my project partner Fleecircus placed a mounting board from behind as a makeshift white backdrop.
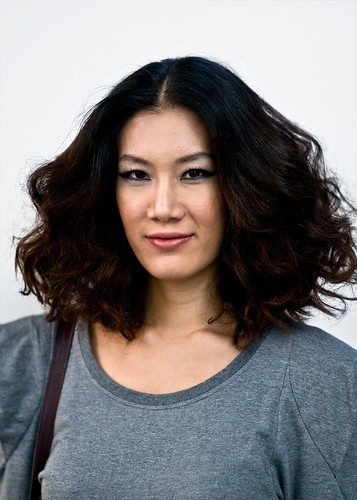
Now I’m going to remove the white backdrop and replace it with a bokeh background taken in Orchard. One quick way to do this is to create a mask of the background using the menu Select > Color Range. The resulting image is shown below. Notice that the mask around the hair is very rough and still shows a lot of remnants of the original backdrop.
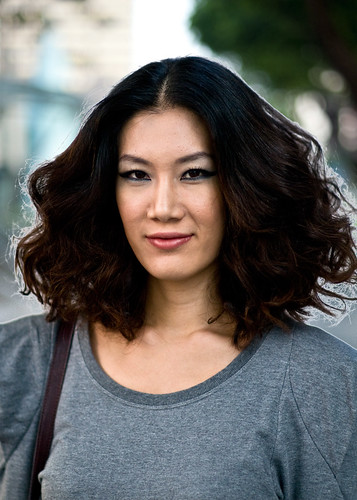
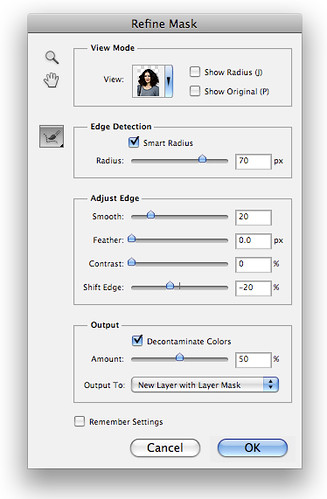
To make a smoother and more accurate mask and remove the disturbing white remnants, I use the new “Refine Mask” feature (it’s ‘Refine Edge’ if you’re working with selections).
Now we have a street portrait as if the white backdrop was never there. Sure it’s not perfect if you start to pixel peep, but for a process that took less then 3 minutes, this is not bad.
There is a limitation to this feature though: it works best on photos with plain-colored backdrops. Extracting subjects against natural multi-colored backgrounds would be a little tricky and will require a bit more than the 3-minute work I did with my example above.
Content-aware Fill
There are times when certain elements in the photograph becomes an unnecessary distraction. And there are always tools that can help alleviate the situation, like the clone tool, or the heal tool. Introducing the Content-Aware Fill: the easier, faster solution.
Below is a street shot I captured about 2 years ago of a young lady passing by a backlit billboard Fendi ad.
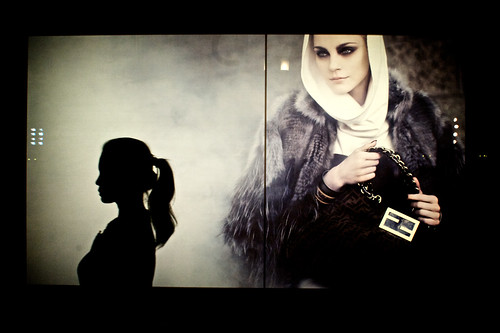
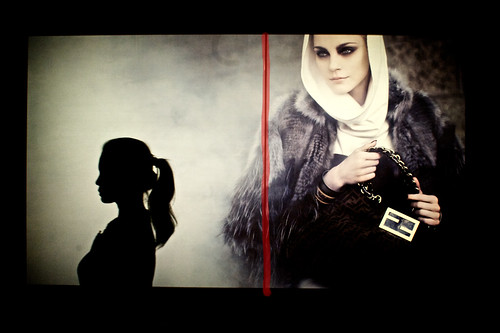
You’ll notice that there are some distracting reflections from the glass-paneled ad (marked in red). By practice, I rarely do this with my street shots. But for the sake of demonstration, let’s go ahead and remove all these reflections to make a cleaner photograph.

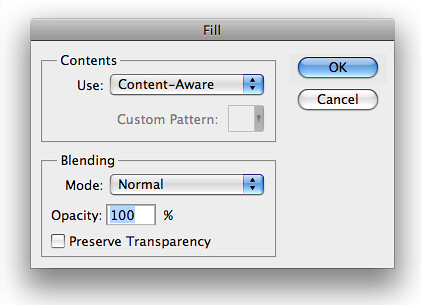
I can do this by simply selecting each area, then using the Fill command with the ‘Content-Aware’ feature.
In a matter of seconds, I’ve removed the reflections. Yes, we can always do this through other Photoshop features like the clone tool, but this is way quicker and hassle-free.

Just as with anything that looks too good to be true, it’s not perfect. At times, it produces funky results particularly when dealing with larger selections. But it’s nothing that can’t be corrected with a few quick trial-and-errors.
Spot Healing Brush: Content-Aware option
Now again, for the sake of demonstration, we want to remove that black vertical line in the middle of the ad. I can do this quickly by using the ‘Spot Healing Brush’ with the “Content-Aware” feature selected. I simply draw over that black vertical line (as shown below).
And in a matter of seconds, we end up with a cleaner image. Again, there are always other tools that can be used in Photoshop to do this, but this is a pretty good alternative… and quicker at that.

Disclaimer: I’m not suggesting that you remove all distractions from a street shot. In fact, certain distractions actually make a street shot look more real and more raw. The example above was just done for demonstration purposes only.
Noise Reduction
Personally, I don’t mind having noise in my photographs. I think it gives that special texture in a photograph that makes it feel more raw. That’s why I never really bothered with the very many noise reduction softwares and plugins I’ve heard about for years. Coming across this feature in Photoshop, I realized it’s handy to have around in times when noise in photos just aren’t appropriate, especially in portraiture (which I’m starting to dive into).
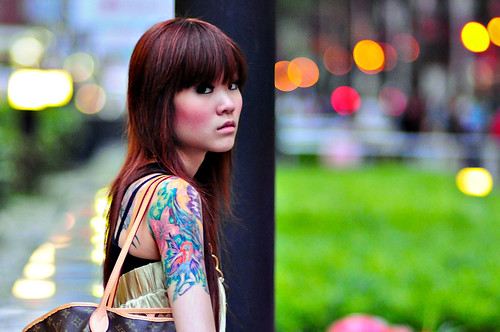
For testing purposes, I used one of my candid street portraits taken in Orchard years ago. I remember it was late in the afternoon past 6pm, the sun was going down and I decided to call it a day. But when I saw this girl and decided to try my luck with the low light. Even at f1.4, the ISO shot up to 1000 resulting to a relatively noisy/grainy photo.
Though the noise isn’t very obvious from the image above, here’s a closer look of the unprocessed RAW file, opened in Camera Raw:
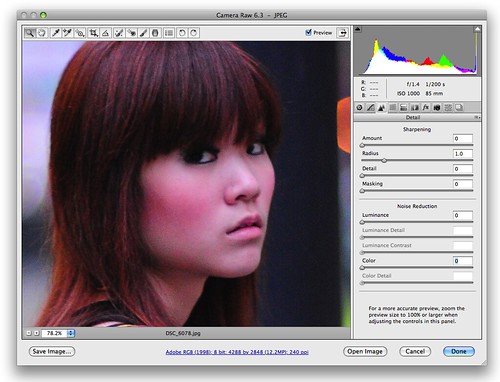
The noise was reduced significantly after a few adjustments in the settings. I was so used to seeing this photo in it’s grainy form that I was pleasantly surprised when I saw it almost spick and span.

These are just some of the new/improved features in Photoshop CS5 Extended, those which I think I can use for my purposes as a designer and photographer. There are a lot of other new cool features in this latest version:
- Adding grain and vignettes – to get that retro look from the film days.
- Automatic lens correction – to fix those nasty distortions from using ultra wide angle lenses.
- One-click straightening – a quick fix for unintentionally slanted photos (which I actually don’t mind)
- Workspace switcher – this is pretty handy for me since the tools I use as a designer is different to the tools I use as a photographer.
- Reshaping image elements with Puppet Warp – This is a fun new feature, but I don’t see much use for it for me for now. But if you want to see what it does, click here for a quick video introduction.
- Other features – There are other new features which I’m not so excited about since I don’t see myself using in my line of work. But it might come in hand for some, like HDR rendering and 3D text.
Conclusion
From a guy who’s used Photoshop for more than a decade (man, I’m old), it just keeps getting better and better. And looking through their new features, they clearly made it easy for graphic designers and photographers to do the usual drudging and monotonous tasks to achieve the image that you want.
It’s not a miracle machine though that can do everything for me. My two new favorite features, Refine Edge & Content-Aware Fill, is an amazing gift. It’s not perfect, but with a bit of work and know-how, it does help me get the results I want at a much quicker pace, allowing me to concentrate less on technicality and more on creativity.
Some useful YouTube links: